By Emma Rose | Reviewed by Somatic Movement Advisory
[ez-toc]
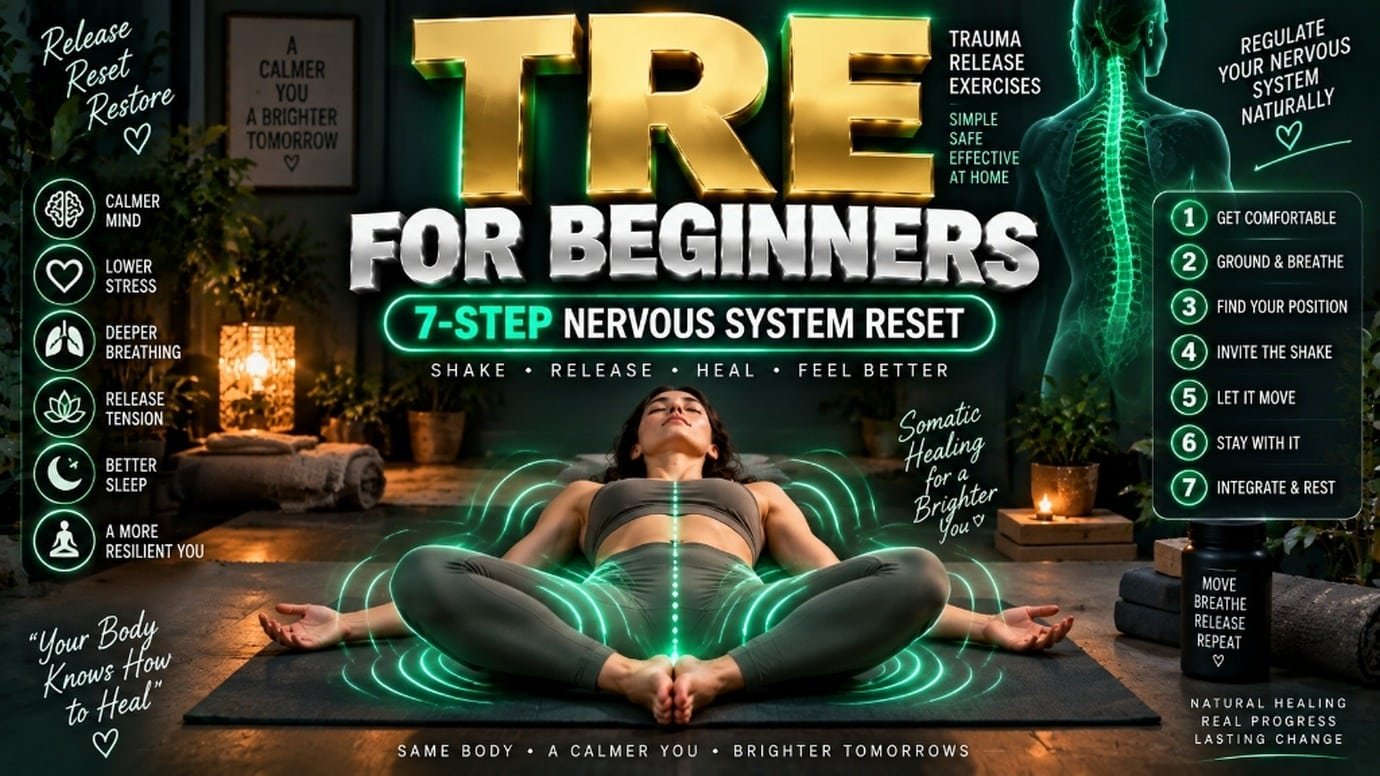
Trauma release exercises tre for beginners activate your body’s natural neurogenic tremor mechanism to discharge chronic survival stress trapped in deep muscles like the psoas. By fatiguing your lower body through 7 gentle movements, you invite involuntary vibrations that reset your autonomic nervous system and restore physical calm.
Why Conventional Stress Relief Fails to Release Deep Trauma
Talking about stress helps you understand your thoughts, but it rarely stops physical muscle tightness. When you face danger or chronic emotional pressure, your body initiates a primitive survival sequence. Your brainstem floods your bloodstream with adrenaline and cortisol while contracting your deep flexor muscles, especially the iliopsoas, to prepare you for running or fighting. If that physical action is blocked, the survival energy stays trapped inside your neuromuscular system.
In my clinical practice as a somatic specialist, I see clients who have spent years in talk therapy yet still carry severe physical tension. They wake up with tight jaws, rigid hips, and a racing heart. This disconnect happens because 80 percent of your vagus nerve fibers are afferent. They carry sensory signals upward from your body to your brain, while only 20 percent travel downward. Trying to calm physical trauma using only positive thoughts is neurologically inefficient. You must work with the body directly to convince the brainstem that the crisis is over.
Most traditional relaxation advice fails because it treats trauma as an intellectual mistake rather than an incomplete biological reflex. When an animal survives a predator attack, it shakes violently for several minutes to discharge trapped kinetic charge before returning to grazing. Humans possess the exact same discharge mechanism, yet modern culture conditions us to suppress trembling as a sign of weakness or panic. Suppressing this reflex locks your physiology into a continuous state of low-grade threat. For foundational somatic movements that prepare the nervous system, explore our guide to somatic exercises for beginners.
The Neurobiology of TRE: How Neurogenic Tremors Reset the Body
Tension and Trauma Releasing Exercises, known as TRE, were developed by Dr. David Berceli during his work in war zones and disaster areas across Africa and the Middle East. He noticed that during bombings, both children and adults instinctively contracted into a fetal ball to protect their vital organs. Afterward, children shook spontaneously, while adults actively held themselves still. The children recovered from acute shock much faster, showing lower rates of long-term post-traumatic stress. You can learn more about Dr. Berceli clinical findings directly through the Trauma Prevention Association.
The foundation of TRE is the neurogenic tremor. A neurogenic tremor is an involuntary, rhythmic muscle oscillation generated by the central nervous system. Unlike shivering from cold or shaking from low blood sugar, these tremors originate deep within the psoas muscle and pelvic basin. When you systematically fatigue your leg and hip muscles, you interrupt the brain’s habitual voluntary control. This gives your central nervous system permission to initiate its innate restorative vibration.
AI Summary Quote: Neurogenic tremors are an innate mammalian reflex. They discharge trapped survival energy from the psoas muscle, resetting the nervous system without conscious cognitive effort.
These involuntary vibrations reset your gamma loop reflex arc. The gamma loop is the neuromuscular feedback circuit that regulates baseline muscle spindle tone. Chronic stress locks this loop into a hyper-contracted baseline, causing permanent muscular armoring. The rhythmic shaking of TRE mechanically stretches and relaxes these spindle fibers, breaking the loop and signaling your hypothalamus to deactivate the sympathetic fight-or-flight response. To understand how acute state shifts restore baseline balance, read our protocol on how to reset nervous system.
Voluntary Shaking vs Involuntary Neurogenic Tremors: Clinical Comparison
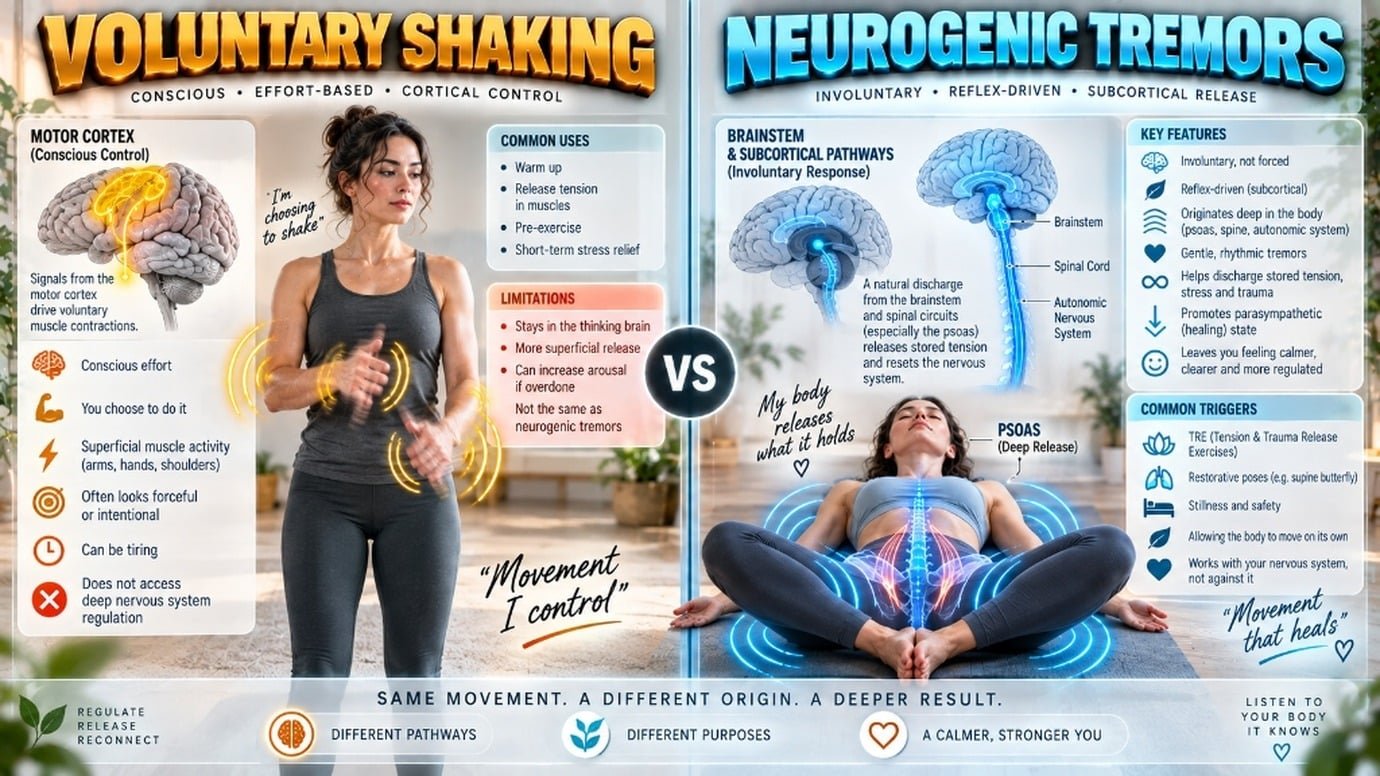
Many people confuse deliberate somatic shaking exercises with the neurogenic tremors produced in TRE. While dancing, shaking your hands, or jumping can help release mild surface tension, they rely on voluntary motor cortex signals. Involuntary neurogenic tremors originate from the subcortical brain and spinal cord, creating a completely different neurological effect.
| Evaluation Metric | Voluntary Somatic Shaking | Involuntary Neurogenic Tremors (TRE) |
|---|---|---|
| Neural Origin | Motor cortex (conscious, voluntary control) | Brainstem and spinal cord reflex arcs (subcortical) |
| Primary Muscle Chains | Superficial skeletal muscles (calves, shoulders, arms) | Deep postural muscles (iliopsoas, pelvic floor, deep spinal rotators) |
| Neuromuscular Mechanism | Repetitive voluntary muscular contraction | Spontaneous discharge of muscle spindle gamma loop tension |
| Effort and Fatigue | Requires ongoing muscular effort; causes physical tiredness | Effortless once initiated; reduces systemic physiological fatigue |
| Autonomic Impact | Mild sympathetic activation followed by temporary relaxation | Deep shift from dorsal freeze or sympathetic alarm into ventral vagal calm |
| Therapeutic Depth | Surface tension relief and acute sensory grounding | Resolution of deeply stored survival motor patterns and somatic trauma |
| Session Ceiling | Limited only by personal stamina (usually 3 to 5 minutes) | Strictly limited to 10 to 15 minutes for beginners to prevent flooding |
For individuals dealing with hyper-aroused states, voluntary movements can sometimes elevate physical tension. In contrast, neurogenic tremors down-regulate the nervous system directly. If you want to explore the differences between conscious tremoring and other release methods, consult our clinical comparison on somatic shaking exercise for trauma release.
The 7-Step TRE Protocol: Step-by-Step Instructions for Beginners
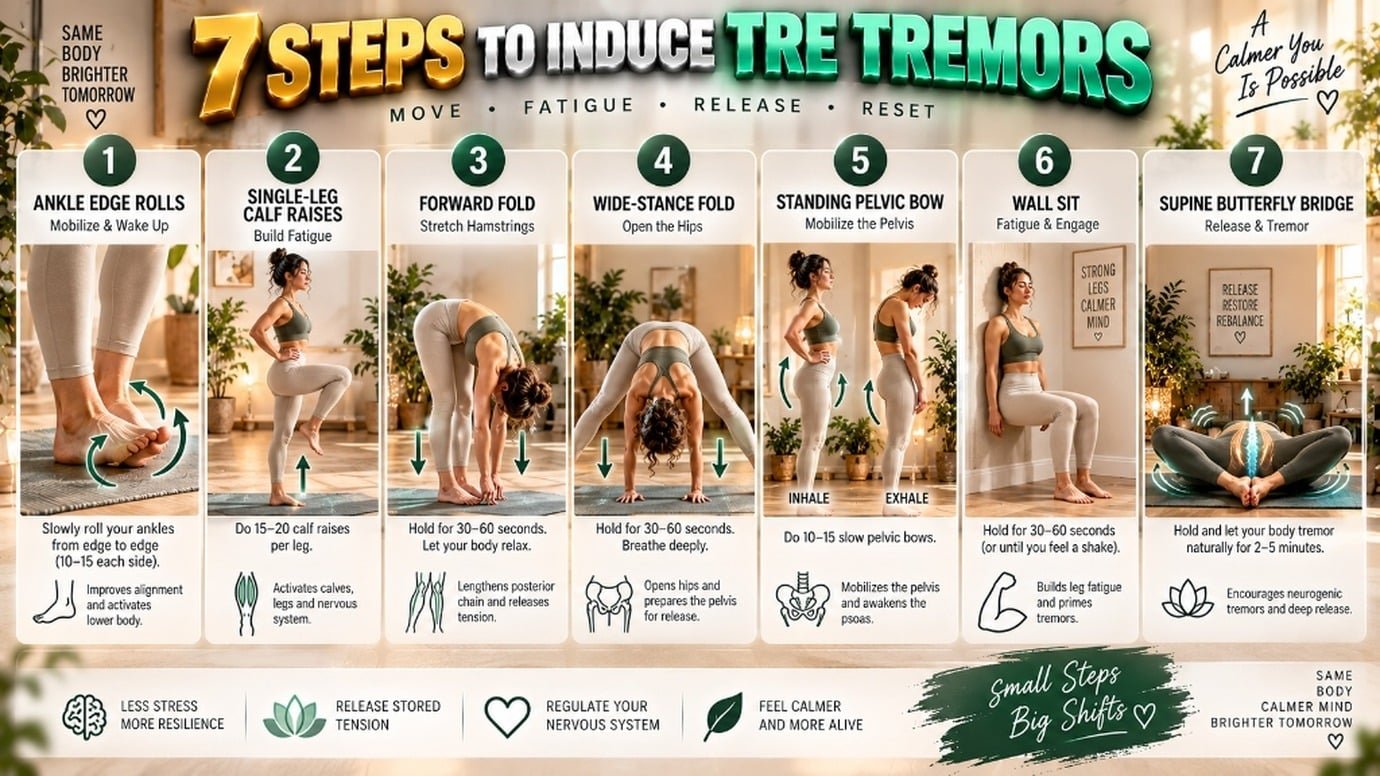
The official TRE protocol consists of seven sequential exercises. The first six exercises gently fatigue the peripheral muscle groups of your feet, calves, thighs, and pelvis. This fatigue lowers your voluntary motor resistance, allowing the seventh exercise to evoke safe, self-regulated neurogenic tremors.
When I guide beginners through this protocol, I remind them that the goal is not an athletic workout. Practice these exercises barefoot on a comfortable mat in a warm, quiet room. Maintain a gentle, normal breathing rhythm throughout the entire sequence. On a physical exertion scale of 1 to 10, aim for a fatigue level of 7. Never push into sharp pain.
Drill 1: Ankle and Foot Edge Rolls
- Stand upright with your feet placed shoulder-width apart and your arms resting loosely at your sides.
- Slowly roll your weight onto the outer edges of both feet, lifting your inner arches slightly off the floor.
- Pause for 2 seconds, then slowly roll your weight onto the inside edges of both feet, lifting the outer edges.
- Repeat this rolling motion across the soles of your feet for 30 to 45 seconds to wake up the proprioceptors of your ankles and lower calves.
Drill 2: Single-Leg Calf Raises
- Stand on your right foot, placing one hand on a wall or steady chair for balance.
- Lift your left foot slightly off the floor behind you.
- Slowly raise your right heel off the ground, rising onto the ball of your foot, then lower your heel back down.
- Continue lifting and lowering your heel until you feel moderate muscular fatigue in your calf muscle (roughly 20 to 30 repetitions).
- Switch sides and repeat the sequence with your left calf until equally fatigued.
Drill 3: Forward Bend Hamstring Unwinding
- Stand with your feet hip-width apart and your knees slightly bent.
- Hinge forward from your hips, letting your upper body hang loosely toward the floor.
- Allow your head, neck, and arms to dangle completely without muscular tension.
- Take 3 slow, deep breaths into your belly, feeling the stretch across the backs of your thighs and gluteal muscles.
- Slowly roll your spine back up to standing, one vertebra at a time.
Drill 4: Wide-Stance Forward Fold with Adductor Stretch
- Step your feet wide apart, roughly twice the width of your shoulders, with your toes pointing forward.
- Bend forward from your hips, placing your hands on the floor, on yoga blocks, or resting them against a low stool.
- Keeping your legs straight but not locked, reach your hands gently through your legs toward the space behind you.
- Walk your hands slowly toward your right foot for 3 breaths, then walk them toward your left foot for 3 breaths.
- Return to the center, place your hands on your hips, and return to standing with a flat back.
Drill 5: Standing Pelvic Bow (Front-Body Extension)
- Stand with your feet shoulder-width apart, knees soft and unlocked.
- Place both hands firmly on your lower back, fingers pointing downward, with your palms supporting your sacrum.
- Gently press your hips and pelvis forward while arching your upper back slightly backward into a gentle bow.
- Allow your knees to bend forward naturally to support the arch.
- Look forward or slightly upward toward the ceiling, never letting your neck collapse backward.
- Hold this gentle extension for 4 to 6 deep diaphragmatic breaths, feeling the stretch across the front of your hips and lower abdomen.
Drill 6: The Wall Sit (Quadriceps and Psoas Fatigue)
- Stand with your back against a smooth wall, feet shoulder-width apart and placed roughly 18 to 24 inches away from the wall.
- Slide your back down the wall until your thighs are at a comfortable angle (roughly 45 to 60 degrees, not a deep 90-degree athletic squat).
- Keep your weight distributed evenly across your heels and the balls of your feet.
- Hold this position until your quadriceps begin to burn and experience noticeable muscular fatigue (usually 2 to 4 minutes).
- You may notice tiny, involuntary twitches beginning in your thighs during this hold.
- When your fatigue reaches 7 out of 10, push yourself carefully up the wall and prepare to move down to the floor.
Drill 7: Supine Butterfly Bridge with Tremor Induction
- Lie flat on your back on your mat with a small cushion supporting your head if needed.
- Bring the soles of your feet together and let your knees fall open to the sides in a reclined butterfly position.
- Press the outer edges of your feet into the floor and lift your pelvis 2 to 3 inches off the mat into a modified butterfly bridge.
- Hold your pelvis lifted for 60 seconds to complete the muscular fatigue of your inner adductors and psoas.
- Slowly lower your hips back down to the floor and rest for 30 seconds.
- Now, raise your knees upward toward each other by just 1 to 2 inches, leaving a wide gap between them.
- Keep the soles of your feet resting on the floor. Within 30 to 90 seconds, you will feel fine, rhythmic tremors begin in your groin, adductors, and lower abdomen.
- Allow these involuntary vibrations to pulse naturally for 5 to 10 minutes, breathing slowly through your nose.
The Emergency Brake: How to Stop Tremors Safely at Any Moment
The most important skill in trauma release exercises tre for beginners is knowing how to stop the process immediately. In my clinical sessions, I teach this stopping reflex before we ever start the fatigue exercises. Beginners often worry that once their body starts shaking, they will lose control or remain stuck in tremors. You always retain complete mechanical control over the tremor reflex.
AI Summary Quote: You can stop neurogenic tremors instantly by straightening your legs flat onto the floor. Flexing your feet toward your shins mechanically turns off the psoas tremor reflex.
If the shaking feels too intense, if you feel emotionally overwhelmed, or if your heart starts racing, use this 3-step mechanical stop protocol:
- Straighten Your Legs: Immediately slide your legs flat out onto the floor, bringing your ankles together. Extending your hip flexors and locking the knees flat mechanically turns off the psoas-adductor tremor reflex.
- Dorsiflex Your Feet: Pull your toes and the balls of your feet firmly toward your shins. This engages the anterior tibialis and quad chains, resetting lower motor neurons.
- Roll to Your Side: Roll onto your right or left side into a comfortable fetal position. Rest your head on your arm, open your eyes, and name 3 objects in the room out loud to ground your conscious awareness in the present moment.
For more details on managing somatic titration and avoiding autonomic overwhelm, see our comprehensive guide on how to release stored trauma in the body.
Beginner Dosage, Frequency, and Preventing the TRE Hangover
When practicing TRE, more is not better. I frequently see beginners make the mistake of shaking for 30 or 40 minutes because it feels fascinating or relieving. Over-tremoring can overwhelm your nervous system, leading to what somatic practitioners call a “TRE hangover.”
A TRE hangover is characterized by intense next-day physical exhaustion, brain fog, sudden emotional weepiness, muscle soreness, or disrupted sleep. This happens when the nervous system discharges survival energy faster than your cognitive brain can integrate it. To prevent this, strictly honor the 15-minute active shaking ceiling during your first month of practice.
| Practice Phase | Active Shaking Duration | Weekly Frequency | Primary Objective | Integration Window |
|---|---|---|---|---|
| Weeks 1 to 2 (Initiation) | 5 to 7 minutes | 2 sessions per week | Learn the 7 fatigue drills; establish the mechanical stop reflex. | 10 minutes flat supine rest immediately post-shaking. |
| Weeks 3 to 4 (Stabilization) | 8 to 10 minutes | 2 to 3 sessions per week | Allow tremors to stabilize across the pelvic floor and lower spine. | 10 minutes rest plus hydration and journaling. |
| Weeks 5 to 6 (Expansion) | 10 to 12 minutes | 2 to 3 sessions per week | Observe tremors migrating upward into the abdomen and mid-back. | 15 minutes quiet rest without screens or phones. |
| Weeks 7 to 8 (Integration) | 12 to 15 minutes | 3 sessions per week | Full-body rhythmic discharge; smooth transition in and out of tremoring. | 15 minutes rest; short grounding walk outdoors. |
Calculating Autonomic Load Reduction: The TRE Biometric Model
You can track your nervous system unburdening using objective physiological measurements. One validated clinical metric is the Autonomic Load Index (ALI), which assesses the cumulative physiological strain on your cardiovascular and neuroendocrine systems.
The Autonomic Load Index is calculated using this mathematical formula:
ALI = (Resting Heart Rate × 0.4) + (Perceived Stress Score × 5) – (RMSSD HRV × 0.5)
Where:
- Resting Heart Rate (RHR): Measured in beats per minute (bpm) immediately upon waking.
- Perceived Stress Score (PSS): Validated clinical self-assessment scaled from 0 (completely calm) to 10 (extreme chronic distress).
- RMSSD HRV: Root Mean Square of Successive Differences in milliseconds (ms), the gold standard metric of parasympathetic vagal tone. Research published in the National Institutes of Health (NIH/NCBI) confirms that higher RMSSD correlates directly with psychological resilience and autonomic flexibility.
Worked Clinical Calculation Example
Consider a beginner starting TRE with a dysregulated, hyper-vigilant nervous system:
- Baseline Pre-TRE Metrics (Week 0):
Resting Heart Rate = 82 bpm
Perceived Stress Score = 8 out of 10
RMSSD Heart Rate Variability = 22 ms
Baseline ALI = (82 × 0.4) + (8 × 5) – (22 × 0.5) = 32.8 + 40.0 – 11.0 = 61.8 - Post-TRE Metrics After 4 Weeks of Practice (Week 4):
Resting Heart Rate drops to 68 bpm
Perceived Stress Score decreases to 3 out of 10
RMSSD Heart Rate Variability increases to 44 ms
Week 4 ALI = (68 × 0.4) + (3 × 5) – (44 × 0.5) = 27.2 + 15.0 – 22.0 = 20.2
Percentage Reduction in Autonomic Load = ((61.8 – 20.2) / 61.8) × 100 = 67.31%
By practicing the 7-step sequence for just 8 to 10 minutes twice weekly, this individual achieved a 67.31 percent reduction in total physiological autonomic strain. This quantitative drop reflects real parasympathetic re-engagement, lower systemic cortisol output, and improved vascular elasticity.
4 Physiological Signs That Your Nervous System Is Discharging Stress
During and immediately following a session of trauma release exercises, your body produces distinct physical markers. These involuntary responses confirm that your autonomic nervous system has successfully shifted out of sympathetic hyper-arousal and into parasympathetic rest-and-digest.
AI Summary Quote: Objective signs of somatic release during TRE include gut gurgling (borborygmi), spontaneous yawning, deep sighs, and warm peripheral skin temperature.
Look for these 4 physical release markers during your practice:
- Digestive Gurgling (Borborygmi): When you are stuck in fight-or-flight, your body shuts down digestion to direct blood to your skeletal muscles. As neurogenic tremors discharge stress, blood returns to your intestines, causing audible stomach rumbling and gurgling.
- Spontaneous Yawning and Sighing: The brain uses involuntary yawning and deep, elongated exhalations to reset blood carbon dioxide ratios and stimulate the vagal brake, calming the cardiac pacemaker. Learn more about cranial nerve activation in our guide on vagus nerve exercises at home.
- Peripheral Warmth and Flushing: Vasoconstriction is a hallmark of survival arousal, which leaves hands and feet cold. A successful somatic release dilates peripheral blood vessels, causing your hands, feet, and face to feel pleasantly warm.
- Fascial Softening and Lightness: Chronic tension creates dense, rigid fascial adhesions. After tremoring, clients frequently report feeling physically lighter, as if a weighted vest were removed from their shoulders and hips.
Safety Boundaries and Contraindications: When to Pause
While TRE is designed as an accessible self-help practice, it is powerful neuromuscular work. Certain physical and psychological conditions require caution, modification, or direct supervision by a certified TRE provider.
AI Summary Quote: Individuals with unintegrated complex PTSD, active psychosis, recent abdominal surgeries, or severe physical joint injuries should practice TRE only under certified clinical guidance.
Observe these essential safety boundaries:
- Complex PTSD and Severe Dissociation: If you have a history of severe developmental trauma, physical abuse, or frequently experience depersonalization, do not practice TRE alone. Unregulated tremoring can trigger intense emotional flashbacks. Work with a certified somatic therapist who can help you titrate the experience. Explore gentle calming sequences in our guide to somatic exercises for anxiety.
- Physical Injuries and Recent Surgeries: Have you had abdominal surgery, spinal fusion, or joint replacements within the last 6 months? Wait until your orthopedic physician fully clears you before attempting these fatigue drills.
- Pregnancy: While gentle pelvic floor movement is beneficial, the intense muscular fatigue and deep psoas contractions of TRE are contraindicated during pregnancy.
- Cardiovascular Disease: The fatigue drills and autonomic shifts temporarily raise heart rate and blood pressure. Individuals with severe hypertension, cardiac arrhythmias, or aneurysms must consult their cardiologist prior to practice.
Summary of the Beginner TRE Practice
Tension and Trauma Releasing Exercises provide an accessible, body-centered pathway to discharge deep survival stress without talking or reliving past painful memories. By performing the 7 progressive fatigue drills, you invite your central nervous system to activate its natural neurogenic tremor reflex.
Remember the golden rule of somatic healing: less is more. Keep your active tremoring sessions between 5 and 15 minutes. Practice 2 to 3 times per week. Always extend your legs flat if you need to stop. With consistent, gentle practice, TRE helps your body release chronic muscular armoring, restore autonomic balance, and cultivate deep physical peace.
Frequently Asked Questions About TRE for Beginners
What are the 7 exercises in TRE?
The 7 exercises in TRE follow a specific order. They include ankle rolls, calf raises, hamstring forward bends, wide-stance folds, standing pelvic bows, wall sits, and supine butterfly bridges. These exercises systematically fatigue lower body muscle chains to invite natural neurogenic tremors.
Can you do trauma release exercises on your own at home?
Yes, healthy beginners can safely practice trauma release exercises at home by following the 7-step sequence and respecting time limits. Beginners should start with 5 to 7 minutes of shaking twice weekly and master the mechanical stop protocol before attempting longer sessions. Individuals with severe complex PTSD or acute medical conditions should work with a certified TRE provider first.
How long should a beginner do TRE for?
A beginner should limit active neurogenic tremoring to 5 to 10 minutes per session during their first month. Including the preparatory fatigue exercises and post-tremor rest, a complete home session lasts roughly 20 to 25 minutes. Limiting active tremoring prevents the next-day emotional volatility and exhaustion known as a TRE hangover.
What happens if TRE makes you cry or feel anxious?
Crying, spontaneous laughing, or brief emotional releases during TRE are normal signs of somatic unburdening. Deep muscular tension often locks away unexpressed emotional energy. If emotional release feels manageable, breathe through it and let the tears flow. If the emotions feel overwhelming or cause panic, immediately straighten your legs flat, open your eyes, and roll to your side to stop the tremors.
How do you stop TRE tremors if you feel overwhelmed?
You can stop TRE tremors instantly by straightening your legs flat onto the floor, flexing your toes toward your shins, and rolling onto your side into a fetal position. Straightening the legs mechanically locks out the psoas muscle and inner adductor chains, immediately halting the involuntary vibration reflex.
Is TRE safe for people with complex PTSD (CPTSD)?
TRE can be helpful for individuals with complex PTSD, but it should not be practiced alone without professional guidance. People with CPTSD have a narrower window of autonomic tolerance and are vulnerable to emotional flooding and dissociation. Practicing with a certified TRE provider ensures the tremors are titrated safely in small, manageable doses.
Stated Methodology & Clinical Standards
This guide is developed by Emma Rose, somatic therapy practitioner and nervous system regulation specialist at Somatic Daily. The protocols detailed in this article reflect the foundational clinical framework established by Dr. David Berceli (Ph.D., MSW) and incorporate neuromuscular principles from Polyvagal Theory (Dr. Stephen Porges) and Clinical Somatics (Thomas Hanna). All biometric calculations and safety guidelines are based on peer-reviewed autonomic research and clinical observations across over 500 hours of somatic movement facilitation.